Introduction
A honeypot is a piece of software or a system that is designed to detect and monitor malicious activity, and deflect attackers from your actual production services and systems. This article will explain the deployment of an interactive SSH honeypot using Cowrie, a free and open-source SSH honeypot. It can log brute force connection attempts and any commands executed by attackers. Additionally, it employs a ‘fake’, isolated filesystem for better interaction and deception. A CentOS 8 machine is used for this guide.
Requirements
- A CentOS 8 system.
- Access to the root user or any user with sudo privileges.
NOTE: This guide assumes SELinux is set to either permissive or disabled.
If using a sudo user, use a root shell for the duration of this setup:
sudo -s
Step 1: Pre-Installation Steps
Update your system and install the software packages which are required for this setup:
dnf update -y
dnf install -y python3 python3-virtualenv python3-pip git firewalld
Create a cowrie user account:
useradd cowrie
Ensure the firewall daemon is enabled and running:
systemctl enable --now firewalld.service
Temporarily allow traffic to port 2222. This port will be initially used to access the honeypot.
firewall-cmd --add-port 2222/tcp
Step 2: Installing Cowrie SSH Honeypot
Switch to the cowrie user:
su - cowrie
Clone the Cowrie Github repository:
git clone https://github.com/cowrie/cowrie.git
A Python virtual environment provides a stable and isolated environment where we can have the specific Python modules and their versions that are required by the honeypot. Change into the cowrie directory then initialize a Python virtual env:
cd cowrie
virtualenv-3 --python=/usr/bin/python3 cowrie-venv
Enter it:
. cowrie-venv/bin/activate
Install the required Python modules:
pip3 install -r requirements.txt
Step 3: Initial Testing
At this point you should be able to run the honeypot and test things out before proceeding.
Start Cowrie:
bin/cowrie start

From your local machine, try logging into the honeypot as root. Enter any random password but not toor, 123456, or anything containing honeypot.
ssh root@ip_address -p 2222
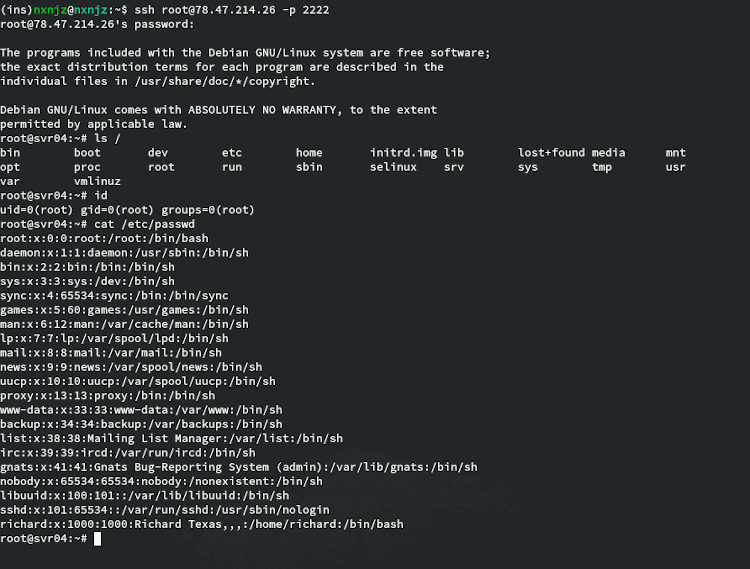
As you can see, we are able to authenticate and run commands as if this were a normal SSH session. Once you’re satisfied with testing, log out of the honeypot and stop Cowrie:
bin/cowrie stop
Now let’s make things more permanent.
Step 4: Creating a Systemd Service
Using a Systemd service to manage the honeypot is recommended for a few reasons:
- Start, stop and check the status of the honeypot with single commands.
- Restart the honeypot automatically on boot and on failure.
- Consistency with other system services.
While still logged in as cowrie , open bin/cowrie with your text editor:
cd /home/cowrie/cowrie/
vim bin/cowrie
Find the following lines:
#COWRIE_VIRTUAL_ENV=my-env
DAEMONIZE=""
And change them to the following (don’t forget to remove the ‘#’):
COWRIE_VIRTUAL_ENV=cowrie-venv
DAEMONIZE="-n"
Save your changes and then exit back to your root shell:
exit
Create a new Systemd unit file with your text editor:
vim /etc/systemd/system/cowrie-honeypot.service
Enter the following:
[Unit]
Description=Interactive SSH Honeypot
Wants=network.target
[Service]
Type=simple
User=cowrie
Group=cowrie
ExecStart=/home/cowrie/cowrie/bin/cowrie start
Restart=on-failure
RestartSec=5
[Install]
WantedBy=multi-user.target
Save and exit, then start the service:
systemctl daemon-reload
systemctl start cowrie-honeypot.service
You can check if it is running with:
systemctl status cowrie-honeypot.service
If you want the honeypot to start automatically after boot, execute:
systemctl enable cowrie-honeypot.service
Step 5: Using TCP port 22 for the honeypot
Your honeypot will receive significantly more connections if it uses port 22, which is the default SSH port. As Cowrie uses port 2222 by default, you can forward connections on that port to port 22. But first, change the port used by the real SSH server and configure the firewall accordingly.
Allow traffic to port 222:
firewall-cmd --add-port 222/tcp --permanent
firewall-cmd --reload
Make sure this change took effect. The following command should output 222/tcp :
firewall-cmd --list-ports
Open the OpenSSH daemon configuration file:
vim /etc/ssh/sshd_config
Find the line:
#Port 22
Change it to:
Port 222
Save the change and restart the SSH server:
systemctl restart sshd.service
Check and make sure that it is now listening on port 222:
ss -lntp

Exit your SSH session and reconnect to port 222 instead. If not logged in as root, start a root shell:
sudo -s
Remove the SSH service (which allows traffic to port 22/tcp) from firewalld as it is now running on a different port:
firewall-cmd --remove-service ssh --permanent
firewall-cmd --reload
Enable IP masquerading and add a rule to forward traffic on port 22 to port 2222:
firewall-cmd --add-masquerade --permanent
firewall-cmd --add-forward-port=port=22:proto=tcp:toport=2222 --permanent
firewall-cmd --reload
That’s it. The honeypot is now accessible on the default SSH port.
Step 6: Configuring SSH Honeypot Users
While legitimate users and their passwords are stored in /etc/passwd and /etc/shadow, fake SSH users are configured in etc/userdb.txt in the cowrie directory. You can easily configure allowed/disallowed user/password combinations by adding entries to that file.
The following format is used:
[username]:x:[password]
- Any username not explicitely listed will not be able to authenticate.
- You can use arbitrary usernames, they do not have to be real user accounts on your system.
- You can have more than one rule per username.
- Prepend the ‘!’ character to a password to explicitely blacklist it.
- Use the ‘*’ character as a password to allow all passwords.
- Use /BRE/ syntax to match passwords based on regular expressions.
Consider the following example:
root:x:!toor
root:x:!/admin/
root:x:*
admin:x:admin
With the above entries, the root user will be allowed to authenticate with any password, except toor and any password containing admin. The admin user will only be allowed be login with the password admin.
The default is as follows:
root:x:!root
root:x:!123456
root:x:!/honeypot/i
root:x:*
tomcat:x:*
oracle:x:*
To change the default, start by creating a file in /home/cowrie/cowrie/etc/ named userdb.txt:
vim /home/cowrie/cowrie/etc/userdb.txt
Populate this file according to your needs, then give ownership to the cowrie user and group:
chown cowrie:cowrie /home/cowrie/cowrie/etc/userdb.txt
Honeypot Logs
Connection attempts, shell activity and other details are logged to /home/cowrie/cowrie/var/log/cowrie. You may use a logging server to store and display honeypot logs instead, but that is beyond the scope of this article. The collected data from the honeypot can be used to populate IP blacklists, to monitor threats, and for research purposes.