Skip to content

NXNJZ

Linux and Security

  • BLOG
  • Cowsay Fortune
  • Contact
  • Gitlab
  • Company Homepage

Tag: debian

How to setup a simple proxy server with tinyproxy (Debian 10 Buster)

Posted on October 7, 2019 - October 8, 2019 by nxnjz
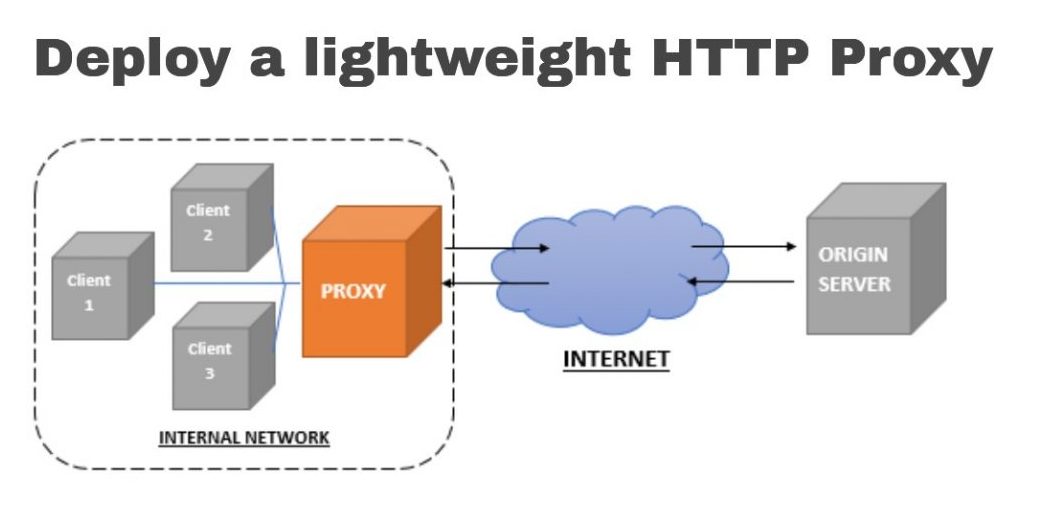
deploy lightweight HTTP proxy

Introduction

Tinyproxy is a lightweight HTTP/HTTPS proxy written in C. It is highly configurable and supports URL-based and domain-based filtering, custom headers and reverse proxying. This article will guide you through the compilation of Tinyproxy from source and its configuration in forward proxy mode.

Prerequisites

  • A newly deployed Debian 10 instance with a public IP address.
  • Access to a root shell via SSH or console.
  • The $EDITOR environment variable should be set.

If you’re using a sudo user, obtain a root shell with sudo -s.

Installation

Step 1: Install dependencies

Start by updating your system:

apt update
apt upgrade -y
reboot

Install the packages required for fetching and building tinyproxy:

apt install -y git automake build-essential asciidoc xsltproc

Step 2: Install tinyproxy

Download tinyproxy from its github repository:

cd /tmp
git clone https://github.com/tinyproxy/tinyproxy.git

Generate the GNU configure script:

cd tinyproxy
./autogen.sh

Build and Install:

./configure
make
make install
cd ..
rm tinyproxy/ -r

Tinyproxy drops root privileges after binding to the network port. Create a user which will be used by tinyproxy:

useradd -M -U -s /bin/false tinyproxy

This command creates a user named tinyproxy without a home directory and with /bin/false as the login shell to disable login.

Create the file to be used for logging and give ownership to the tinyproxy user:

mkdir -p /usr/local/var/log/tinyproxy
touch /usr/local/var/log/tinyproxy/tinyproxy.log
chown tinyproxy:root /usr/local/var/log/tinyproxy/tinyproxy.log

Step 3: Initial Proxy Configuration

Rename the default config file and create a new one:

mv /usr/local/etc/tinyproxy/tinyproxy.conf /usr/local/etc/tinyproxy/tinyproxy.conf.orig
$EDITOR /usr/local/etc/tinyproxy/tinyproxy.conf

And input the following:

##User/Group to use after dropping root
User tinyproxy
Group tinyproxy

##Port and address to bind to
Port 8888
Bind 0.0.0.0

##File locations
DefaultErrorFile "/usr/local/share/tinyproxy/default.html"
StatFile "/usr/local/share/tinyproxy/stats.html"
LogFile "/usr/local/var/log/tinyproxy/tinyproxy.log"
LogLevel Info
PidFile "/var/run/tinyproxy.pid"

##Authentication
BasicAuth your_username your_secure_password

##HTTP Headers
ViaProxyName "server-hostname"
DisableViaHeader No

##Threading
StartServers 5
MinSpareServers 5
MaxSpareServers 10 
MaxRequestsPerChild 0

##Connection
Timeout 600
MaxClients 100

(Replace your_username, your_secure_password and server_hostname with your own values).

This configuration is a sensible starting point for a basic HTTP/HTTPS proxy. It instructs tinyproxy to operate as a forward proxy with password authentication, on port 8888 on your public interface, and to drop to lower user privileges after the initial execution. It also specifies the location of various files and the maximum number of concurrent connections allowed, among other parameters.

Test your configuration by executing : /usr/local/bin/tinyproxy -c '/usr/local/etc/tinyproxy/tinyproxy.conf' followed by ss -lntp | grep tinyproxy. If tinyproxy was able to start and bind, the output of the latter command should be something like:

LISTEN    0         128                0.0.0.0:8888             0.0.0.0:*        users:(("tinyproxy",pid=27638,fd=0),("tinyproxy",pid=27637,fd=0),("tinyproxy",pid=27636,fd=0),("tinyproxy",pid=27635,fd=0),("tinyproxy",pid=27634,fd=0),("tinyproxy",pid=27633,fd=0))
LISTEN    0         128                   [::]:8888                [::]:*        users:(("tinyproxy",pid=27638,fd=1),("tinyproxy",pid=27637,fd=1),("tinyproxy",pid=27636,fd=1),("tinyproxy",pid=27635,fd=1),("tinyproxy",pid=27634,fd=1),("tinyproxy",pid=27633,fd=1))

And try sending a connection through the proxy:

curl --proxy http://127.0.0.1:8888 --proxy-user your_username https://httpbin.org/ip

Curl will prompt you for the proxy password. If the connection succeeds, your server’s IP should be returned in the response.

Step 4: Service File

Kill any tinyproxy processes before proceeding:

pkill -e tinyproxy

We will wrap the tinyproxy executable in a systemd unit file for easy service management abilities, such as starting, stopping, autostarting at boot, etc. Use the following command to create a service file:

$EDITOR /etc/systemd/system/tinyproxy.service

And paste the following:

[Unit]
Description=Tinyproxy daemon
Requires=network.target
After=network.target

[Service]
Type=forking
PIDFile=/var/run/tinyproxy.pid
ExecStart=/usr/local/bin/tinyproxy -c '/usr/local/etc/tinyproxy/tinyproxy.conf'
Restart=on-failure

[Install]
WantedBy=multi-user.target

Save and exit, then reload the systemd configuration:

systemctl daemon-reload

You can now use systemctl to start, stop and restart tinyproxy as follows:

systemctl start tinyproxy
systemctl stop tinyproxy
systemctl restart tinyproxy

If tinyproxy should be started automatically, execute the command:

systemctl enable tinyproxy.service

Step 5: Authentication configuration (optional)

We configured the proxy to use password authentication. If you’d like to whitelist certain IPs instead, comment the BasicAuth line and whitelist the IP addresses that should be allowed to connect using the following syntax:

Allow IP_ADDR[/xx]

For example:

[...]

##Authentication
#BasicAuth your_username your_secure_password
Allow 127.0.0.1
Allow 192.168.0.0/24
Allow 203.0.113.113
ViaProxyName "server_hostname"

[...]

NOTE: By whitelisting/blacklisting any host or network with Allow/Deny, all other hosts are denied access. If no Allow or Deny keywords are present, all hosts are allowed to connect.

The configuration shown here would allow connections from 127.0.0.1 (i.e. the loopback interface), from the whole /24 range of the local 192.168.0.x private network, and from the remote host with IP address 203.0.113.113/

Restart the tinyproxy daemon whenever you make changes to the configuration:

systemctl restart tinyproxy.service

More Info

  • tinyproxy(8) Manual
  • tinyproxy.conf(5) Manual
Posted in LinuxTagged debian, http, proxy3 Comments

How to Install qdPM 9.1 on Debian 10 LEMP

Posted on September 30, 2019 - November 21, 2019 by nxnjz

Introduction

qdPM is a free and open-source web application for project management. It is designed for small teams working on multiple projects and allows easy management of tasks and roles. qdPM is fully configurable and features a customer-facing ticket system that is integrated into task management. This guide will help you through the complete installation and configuration of qdPM 9.1 on a Debian 10 system running Nginx.

Prerequisites

  • A fresh Debian 10 instance.
  • Root access to your server
  • Optionally, a domain name with an A record pointing to your IP address (required for HTTPS setup.)

NOTE: pm.example.com should be replaced with your public IP address or domain name.

Installation

Step 1: Installing PHP, Nginx and MariaDB.

qdPM requires a web server with PHP processing and a MySQL database. We will install and setup Nginx, PHP-FPM, and MariaDB to fulfill those requirements.

Update your system and software:

apt update
apt upgrade -y

Install Nginx, PHP, MariaDB, and other required packages:

apt install -y nginx php-fpm php-mysql php-xml mariadb-server unzip wget

And make sure the Nginx, PHP-FPM and MariaDB services are enabled and running:

systemctl enable --now nginx.service mariadb.service php7.3-fpm.service

Step 2: Database Setup.

We’ll create a database and a corresponding user dedicated to qdPM. But first, secure your MySQL installation with the following script:

mysql_secure_installation

During the process, answer questions as shown below:

Enter current password for root (enter for none): Press :key_enter:
Set root password? [Y/n]: y
New password: <your-secure-password>
Re-enter new password: <your-secure-password>
Remove anonymous users? [Y/n]: y
Disallow root login remotely? [Y/n]: y
Remove test database and access to it? [Y/n]: y
Reload privilege tables now? [Y/n]: y

Now let’s setup the database and user:

mysql -u root -p

Enter the MariaDB root password you set earlier to log in. In the MySQL cli, use the following commands to create a database and user:

CREATE DATABASE qdpm_db default charset utf8;
CREATE USER 'qdpm_user'@'localhost' IDENTIFIED BY 'StrongPasswordHere';
GRANT ALL PRIVILEGES ON qdpm_db.* TO 'qdpm_user'@'localhost';
EXIT;

Step 3: Download qdPM.

Use the following command to download qdPM 9.1:

wget https://netix.dl.sourceforge.net/project/qdpm/qdPM_9.1.zip

Unzip to the webroot:

unzip -d /var/www/html/qdpm qdPM_9.1.zip
rm qdPM_9.1.zip

And give ownership of the qdpm directory to the Nginx process owner:

chown -R www-data:www-data /var/www/html/qdpm/

Step 4: Nginx configuration.

We’ll now configure Nginx. Create a server block file in /etc/nginx/sites-available/ with a text editor of your choice. For example:

nano /etc/nginx/sites-available/qdpm80.conf

Add the following lines (while replacing pm.example.com with your own domain name or IP address).

server {
    listen 80;
    listen [::]:80;
    server_name pm.example.com;
    root /var/www/html/qdpm;
    index index.php;

    location / {
        try_files $uri /index.php$is_args$args;
    }

    location ~* \.php$ {
        fastcgi_pass unix:/var/run/php/php7.3-fpm.sock;
        include fastcgi_params;
        fastcgi_param SCRIPT_FILENAME $realpath_root$fastcgi_script_name;
        fastcgi_param DOCUMENT_ROOT $realpath_root;
    }

    error_log /var/log/nginx/qdpm_error.log;
    access_log /var/log/nginx/qdpm_access.log;
}

We now need to enable it by creating a symbolic link in the ‘sites-enabled’ directory, and reload the Nginx service to apply the new configuration:

ln -s /etc/nginx/sites-available/qdpm80.conf /etc/nginx/sites-enabled/
systemctl reload nginx.service

Your qdPM instance should be accessible at http://pm.example.com/. Proceed to step 5 if you want to configure HTTPS, or skip to step 6 to finalize the installation process.

Step 5a: HTTPS configuration (Optional but highly recommended).

Please note that this step will not work with an IP address, a domain name is required. Start by installing certbot, a tool for obtaining an SSL certificate for your domain name from Let’s Encrypt:

apt install -y certbot 
certbot certonly --webroot --agree-tos -m youremail@domain.tld -d pm.example.com

You’ll be prompted to input the webroot location for your domain, enter /var/www/html/qdpm. Certbot will verify ownership of your domain and will issue an SSL certificate which will be used to setup HTTPS. Next, create another server block file:

nano /etc/nginx/sites-available/qdpm443.conf

And add these lines:

server {
    listen 443;
    listen [::]:443;
    server_name pm.example.com;
    root /var/www/html/qdpm;
    index index.php;

    ssl on;
    ssl_certificate /etc/letsencrypt/live/pm.example.com/fullchain.pem;
    ssl_certificate_key /etc/letsencrypt/live/pm.example.com/privkey.pem;

    location / {
    try_files $uri $uri/ /index.php?$args;
    }

   location ~* \.php$ {
       fastcgi_pass unix:/var/run/php/php7.3-fpm.sock;
       include fastcgi_params;
       fastcgi_param SCRIPT_FILENAME $realpath_root$fastcgi_script_name;
       fastcgi_param DOCUMENT_ROOT $realpath_root;
    }

    error_log /var/log/nginx/qdpm_error.log;
    access_log /var/log/nginx/qdpm_access.log;

}

Enable this configuration file and reload the Nginx service:

ln -s /etc/nginx/sites-available/qdpm443.conf /etc/nginx/sites-enabled/
systemctl reload nginx.service

Step 5b: HTTP to HTTPS redirection (optional)

If you’d like to redirect all incoming HTTP traffic to HTTPS, open /etc/nginx/sites-available/qdpm80.conf in a text editor and add the following line after the server_name directive:

 return 301 https://pm.example.com$request_uri;

And reload the Nginx service once again:

systemctl reload nginx.service

Step 6: Web Installer

Navigate to http://pm.example.com/ or https://pm.example.com/. You should get see the message Environment checked. No errors found. You can install qdPM.. Click Database Config and fill in the form as follows:

  • Database host: localhost
  • Database port: Leave blank.
  • Database name: qdpm_db
  • DB username: qdpm_user
  • DB password: Enter the password you chose during user creation in step 2.

Now click “Install Database” and enter your email and password to create the default administrator account.

Finally, wait for the web installer to finish and login via SSH and remove the install directory:

rm /var/www/html/qdpm/install/ -rf

Your qdPM installation is now complete.

Posted in LinuxTagged debian, linux, project managementLeave a comment

How to Install SuiteCRM on Debian 10 Buster

Posted on September 23, 2019 - May 1, 2020 by nxnjz

SuiteCRM is a free and open source alternative to the popular customer relationship management system SugarCRM. It became popular when SugarCRM decided to stop development of its community edition, on which SuiteCRM is based. This guide will explain the installation of SuiteCRM on a Debian 10 system.

Prerequisites

  • A fresh Debian 10 system.
  • Root SSH or console access.
  • A domain name pointing to the server’s IP address.

NOTE: All occurences of crm.example.net should be replaced with your own domain name.

Step 1: update and install required software.

apt update 
apt upgrade -y

SuiteCRM is written in PHP, and can run on Apache2, so you will need to install the Apache web server, PHP itself, PHP modules, and MariaDB.

apt install -y apache2 mariadb-server mariadb-client php php-common php-zip php-mysql php-gd php-curl php-imap php-mbstring php-xml php-json libapache2-mod-php unzip libpcre3

Step 3: MariaDB setup.

Before creating a database, tighten your MariaDB security by running the mysql_secure_installation script:

mysql_secure_installation

Answer all of the questions as shown below and make sure you choose a strong password for the root user:

Enter current password for root: Press <enter>
Set root password? [Y/n] y
Remove anonymous users? [Y/n] y
Disallow root login remotely? [Y/n] y
Remove test database and access to it? [Y/n] y
Reload privilege tables now? [Y/n] y

Once the script exits, log into the MySQL shell with the following command:

mysql -u root -p

Enter your root password you chose earlier, then the following to create a database for SuiteCRM:

MariadDB [(none)]> CREATE DATABASE suitecrm;

Create a database user with the following command:
MariaDB [(none)]> CREATE USER 'suitecrm'@'localhost' IDENTIFIED BY 'StrongPasswordHere';

Grant privileges to the database:

MariaDB [(none)]> GRANT ALL PRIVILEGES ON suitecrm.* TO 'suitecrm'@'localhost';

Exit from the MySQL shell:

MariaDB [(none)]> \q

Step 4: Download SuiteCRM.

First, copy the download link for the latest stable version of SuiteCRM from their official download page, and download it as follows (use the latest URL instead):

wget -O suitecrm.zip https://suitecrm.com/files/162/SuiteCRM-7.11/448/SuiteCRM-7.11.6.zip
unzip suitecrm.zip
rm suitecrm.zip

Next, move the extracted directory to the web root:

mv SuiteCRM* /var/www/html/suitecrm

Next, set correct ownership and permissions:

cd /var/www/html/suitecrm
chown -R www-data:www-data .
chmod -R 755 .
chmod -R 775 cache custom modules themes data upload
chmod 775 config_override.php 2> /dev/null

Step 5: PHP configuration.

Using a text editor of your choice, open /etc/php/7.3/apache2/php.ini for editing and make changes according to the following values:

memory_limit = 256M
post_max_size = 64M
upload_max_filesize = 64M

Step 6: Configure Apache for SuiteCRM.

Create an Apache virtual host configuration file for SuiteCRM using a text editor of your choice. For example:

vim /etc/apache2/sites-available/suitecrm80.conf

Add the following lines:

<VirtualHost *:80>

 DocumentRoot /var/www/html/suitecrm
 ServerName crm.example.net

 <Directory /var/www/html/suitecrm>
    Options FollowSymLinks
    AllowOverride All
 </Directory>

 ErrorLog /var/log/apache2/suitecrm-error.log
 CustomLog /var/log/apache2/suitecrm-access.log common

</VirtualHost>

Then save and close the file. Disable the default site and enable the newly created one:

a2ensite suitecrm80.conf
a2dissite 000-default.conf

Finally, reload Apache:

systemctl reload apache2

Step 7: HTTPS configuration (optional, highly recommended)

Install certbot, which we will use to obtain a free SSL certificate:

apt install -y certbot

Temporarily stop the Apache service:

systemctl stop apache2.service

Obtain a certificate for your domain:

certbot certonly --standalone --agree-tos -m youremail@domain.tld -d crm.example.net

Restart Apache:

systemctl start apache2.service

To setup redirection from HTTP to HTTPS, open the file /etc/apache2/sites-available/suitecrm80.conf in a text editor and add the following lines before the closing virtual host tag (</VirtualHost>)

RewriteEngine on
RewriteCond %{SERVER_NAME} =crm.example.net
RewriteRule ^ https://%{SERVER_NAME}%{REQUEST_URI} [END,QSA,R=permanent]

Then enable the apache rewrite and ssl modules:

a2enmod rewrite
a2enmod ssl

We’ll now create the necessary configuration for HTTPS, paste the following in /etc/apache2/sites-available/suitecrm443.conf:

<VirtualHost *:443> 

  DocumentRoot /var/www/html/suitecrm
  ServerName crm.example.net

  SSLEngine on
  SSLCertificateFile /etc/letsencrypt/live/crm.example.net/fullchain.pem
  SSLCertificateKeyFile /etc/letsencrypt/live/crm.example.net/privkey.pem
  SSLProtocol all -SSLv2 -SSLv3
  SSLCipherSuite ECDHE-RSA-AES128-GCM-SHA256:ECDHE-ECDSA-AES128-GCM-SHA256:ECDHE-RSA-AES256-GCM-SHA384:ECDHE-ECDSA-AES256-GCM-SHA384:DHE-RSA-AES128-GCM-SHA256:DHE-DSS-AES128-GCM-SHA256:kEDH+AESGCM:ECDHE-RSA-AES128-SHA256:ECDHE-ECDSA-AES128-SHA256:ECDHE-RSA-AES128-SHA:ECDHE-ECDSA-AES128-SHA:ECDHE-RSA-AES256-SHA384:ECDHE-ECDSA-AES256-SHA384:ECDHE-RSA-AES256-SHA:ECDHE-ECDSA-AES256-SHA:DHE-RSA-AES128-SHA256:DHE-RSA-AES128-SHA:DHE-DSS-AES128-SHA256:DHE-RSA-AES256-SHA256:DHE-DSS-AES256-SHA:DHE-RSA-AES256-SHA:AES128-GCM-SHA256:AES256-GCM-SHA384:AES128-SHA256:AES256-SHA256:AES128-SHA:AES256-SHA:AES:CAMELLIA:DES-CBC3-SHA:!aNULL:!eNULL:!EXPORT:!DES:!RC4:!MD5:!PSK:!aECDH:!EDH-DSS-DES-CBC3-SHA:!EDH-RSA-DES-CBC3-SHA:!KRB5-DES-CBC3-SHA
  SSLHonorCipherOrder on
  SSLCompression off
  SSLOptions +StrictRequire

  <Directory /var/www/html/suitecrm>
    Options FollowSymLinks
    AllowOverride All
  </Directory>

  ErrorLog /var/log/apache2/suitecrm-error.log
  CustomLog /var/log/apache2/suitecrm-access.log common

</VirtualHost>

Then enable it and restart the apache service:

a2ensite suitecrm443.conf
systemctl restart apache2.service

Step 8: Web Installer

Open your web browser and navigate to crm.example.net/install.php to finalize the installation process. Follow the steps below:

1. You will first have to read and accept the license, terms and conditions, then click “Next”.

2. SuiteCRM will check your environment, make sure all tests show “OK” then proceed to the next step.

3. Fill in the form as shown below:

  • Specify Database Type: MySQL.
  • Database Name: suitecrm.
  • Host Name: localhost.
  • User: suitecrm.
  • Password: Enter the password you chose during MySQL user creation in step 3.
  • SuiteCRM Database User: Same as Admin User.
  • SuiteCRM Application Admin Name: Username of your choice.
  • SuiteCRM Admin User Password: Strong password of your choice.
  • URL of SuiteCRM Instance: http://crm.example.net or https://crm.example.net if you configured HTTPS.
  • Email Address: A valid email address for the site administrator.

Modify the remaining settings if needed.

Step 9: Crontab

We need to setup a cron job in order to run SuiteCRM schedulers, use this command:

crontab -e -u www-data

And add the following line to the bottom:

*    *    *    *    *     cd /var/www/html/suitecrm; php -f cron.php > /dev/null 2>&1

Your SuiteCRM installation is now complete.

Further Reading

  • SuiteCRM User Guide
  • Install VtigerCRM on Debian 10
Posted in LinuxTagged crm, debian, linux4 Comments

How to Install PmWiki on Debian 10 / Nginx / PHP-FPM

Posted on September 19, 2019 - September 20, 2019 by nxnjz

Introduction

PmWiki is an open-source wiki-based content management system built in PHP that was started in 2002, and is designed for collaborative creation and maintenance of websites. It allows quick editing as well as appearance changes using skins and templates. PmWiki also provides flexible password-based access control. This guide will explain the installation of PmWiki on a Debian 10 system with Nginx and PHP-FPM.

Prerequisites

  • A Debian 10 system.
  • Root user access to your server via SSH.
  • Optional: A registered domain name and valid SSL certificate.

NOTE: All occurences of example.com should be replaced with your IP address or with a domain name pointing to that IP.

Installation

Step 1: Update your system

Update your system packages:

apt update 
apt upgrade -y
reboot

Step 2: Install Nginx and PHP

apt install -y nginx php7.3-fpm

Verify that PHP-FPM and the Nginx server are enabled and running:

systemctl enable --now nginx.service php7.3-fpm.service

Step 3: Download and unpack PmWiki

You can download the latest stable release of PmWiki with the following command:

wget http://www.pmwiki.org/pub/pmwiki/pmwiki-latest.tgz

Then unpack the tar archive:

tar -xzf pmwiki-latest.tgz
rm pmwiki-latest.tgz

Now move the pmwiki directory to /var/www/html:

mv pmwiki*/ /var/www/html/pmwiki

Step 4: Nginx configuration:

Create a new virtual host file pmwiki80.conf under /etc/nginx/sites-available/ using a text editor of your choice, such as vim or nano, and paste the following configuration (replace example.com with the IP address of your server, or with your domain name if you’re using one):

server {
    listen 80;
    listen [::]:80;
    server_name example.com;
    root /var/www/html/pmwiki;
index index.php;

    location ~ \.php$ {
        fastcgi_pass unix:/var/run/php/php7.3-fpm.sock;
        include fastcgi_params;
        fastcgi_param SCRIPT_FILENAME $document_root$fastcgi_script_name;
        fastcgi_param SCRIPT_NAME $fastcgi_script_name;
    }
}

Note that this is a very basic Nginx configuration file, further configuration may be necessary depending on your specific requirements.
Save and close the file, then create a symbolic link pointing to it in the sites-enabled directory:

ln -s /etc/nginx/sites-available/pmwiki80.conf /etc/nginx/sites-enabled/

You can now reload the Nginx service to apply those changes:

systemctl reload nginx.service

Step 5: PmWiki Installation

PmWiki needs to have write access in a wiki.d directory:

cd /var/www/html/pmwiki
mkdir wiki.d
chown www-data:www-data wiki.d

Since there is no index.php file by default, we will create it:

echo "<?php include_once('pmwiki.php');" > /var/www/html/pmwiki/index.php

Using a web browser, nagivate to http://example.com/. You should see the default PmWiki homepage if you followed the previous steps correctly. We’ll now customize the installation:

Make sure your current working directory is /var/www/html/pmwiki and copy the sample configuration file for editing:

cd /var/www/html/pmwiki
cp docs/sample-config.php local/config.php
vim local/config.php

We’ll now make the following changes:

  • $WikiTitle = 'Pmwiki'; to $WikiTitle = 'YourWikiTitle';
  • #$ScriptUrl = 'http://example.com/pmwiki/pmwiki.php'; to $ScriptUrl = 'http://example.com/';
  • #$PubDirUrl = 'http://example.com/pmwiki/pub'; to $PubDirUrl = 'http://example.com/pub';
  • Uncomment the following line: #$PageLogoUrl = "$PubDirUrl/skins/pmwiki/pmwiki-32.gif"; and optionally enter the path to a custom logo of your own.
  • # $DefaultPasswords['admin'] = pmcrypt('secret'); to $DefaultPasswords['admin'] = pmcrypt('StrongPasswordHere'); (This sets a site-wide default administrative password).
  • Optional: If you want to allow browser caching, uncomment the following line: # $EnableIMSCaching = 1;.

The other default parameters and values should be reviewed and modified according to your specific needs. Also, all URL schemas should be changed to https:// if you choose to use HTTPS.

Step 6: Nginx HTTPS config

Assuming you have a domain name and a corresponding SSL certificate, you can setup HTTPS:

First create a new configuration file with a text editor of your choice:

vim /etc/nginx/sites-available/pmwiki443.conf

Paste or type the following:

server {
    listen 443;
    listen [::]:443;
    server_name 192.168.2.28;
    root /var/www/html/pmwiki;
    index index.php;

    location ~ \.php$ {
        fastcgi_pass unix:/var/run/php/php7.0-fpm.sock;
        include fastcgi_params;
        fastcgi_param SCRIPT_FILENAME $document_root$fastcgi_script_name;
        fastcgi_param SCRIPT_NAME $fastcgi_script_name;

    }

    ssl on;
    ssl_certificate /path/to/your/cert.pem;
    ssl_certificate_key /path/to/your/key.pem;
}

Enable it and reload the nginx service to apply these changes:

ln -s /etc/nginx/sites-available/pmwiki443.conf /etc/nginx/sites-enabled/
systemctl reload nginx.service

The HTTPS version of your site is now ready. If you wish to permanently redirect all traffic to the secure version, open /etc/nginx/sites-available/pmwiki80.conf in a text editor and add the following line after the server_name directive:

return 301 https://example.com$request_uri

Save and exit, then reload Nginx again:

systemctl reload nginx.service

Finally, re-edit /var/www/html/pmwiki/local/config.php and change the URL schema in all applicable values from http to https.

You should now be able to access PmWiki at https://example.com/.

Further Reading

You can read PmWiki’s documentation on your own instance once you complete the installation. Access it at https://example.com/?n=PmWiki.DocumentationIndex.

PmWiki’s official website is located at www.pmwiki.org.

Posted in LinuxTagged cms, debian, linux, nginx, php1 Comment

How to Install WallaBag on Debian 9.

Posted on March 11, 2019 - November 21, 2019 by nxnjz

Introduction

Wallabag is a self-hosted PHP web application allowing you to save web pages for later reading. It extracts content so that you can read it when you have time. This article will explain the installation of Wallabag on a Debian 9 system.

Prerequisites

  • A Debian 9 installation.
  • Root access to your server (via a user with sudo privileges.)
  • A web server with PHP (Instructions below.)
  • A MySQL database (Instructions below.)

Preparations

Update your system and install required software.

sudo apt update
sudo apt upgrade -y
sudo apt install -y git make composer

Git will be used to download Wallabag from its github repository and composer, via the make command, to install PHP libraries.

Installing a web server stack:

We will be using Apache with PHP, and MariaDB for the database. Execute the following to install the required packages:

sudo apt install -y apache2 php php-common php-xml php-mbstring php-mysql php-json php-pdo php-gd php-tidy php-curl php-bcmath php-zip mariadb-server mariadb-client

Make sure Apache and MariaDB are enabled and running:

sudo systemctl enable --now apache2.service mariadb.service

Configuring Apache

Using a text editor of your choice, create a new Apache configuration file. For instance:

sudo vim /etc/apache2/sites-available/wallabag.conf

Populate it with the following (insert your Vultr IP address or a domain name pointing to your IP for ServerName):

<VirtualHost *:80>
    ServerName IP_or_DOMAIN_NAME 
    DocumentRoot /var/www/wallabag/web
    <Directory /var/www/wallabag/web>
        AllowOverride None
        Order Allow,Deny
        Allow from All
        <IfModule mod_rewrite.c>
            Options -MultiViews
            RewriteEngine On
            RewriteCond %{REQUEST_FILENAME} !-f
            RewriteRule ^(.*)$ app.php [QSA,L]
        </IfModule>
    </Directory>
 <Directory /var/www/wallabag/web/bundles>
        <IfModule mod_rewrite.c>
            RewriteEngine Off
        </IfModule>
    </Directory>
    ErrorLog /var/log/apache2/wallabag_error.log
    CustomLog /var/log/apache2/wallabag_access.log combined
</VirtualHost>

Save, exit, and enable this virtual host:

sudo a2ensite wallabag.conf

Enable the rewrite apache module:

sudo a2enmod rewrite

Restart Apache to apply changes:

sudo systemctl restart apache2.service

Configuring MariaDB

Start by securing your MySQL installation with this command:

sudo mysql_secure_installation

Answer the questions as shown:

Enter current password for root (enter for none): Enter
Set root password? [Y/n]: Y
New password: <your-password>
Re-enter new password: <your-password>
Remove anonymous users? [Y/n]: Y
Disallow root login remotely? [Y/n]: Y
Remove test database and access to it? [Y/n]: Y
Reload privilege tables now? [Y/n]: Y

Make sure you use a strong password.

Configuring MariaDB

Create a database and user for Wallabag:

sudo mysql -u root -p

MariaDB [(none)]> CREATE DATABASE wallabag; 
MariaDB [(none)]> CREATE USER 'wallabaguser'@'localhost' IDENTIFIED BY 'wallabagpassword';
MariaDB [(none)]> GRANT ALL PRIVILEGES ON wallabag.* TO 'wallabaguser'@'localhost';
MariaDB [(none)]> exit;

Make sure you replace wallabagpassword with a secure password. It should be different from the password you chose for the MariaDB root user.

Installing Wallabag

Since Wallabag is hosted on github, we’ll clone the repository locally:

cd /var/www/
sudo git clone https://github.com/wallabag/wallabag.git 

And transfer ownership to the apache user:

sudo chown -R www-data:www-data /var/www/wallabag

It is not recommended to run the installation scripts as root, so we will use the apache user:

sudo -u www-data /bin/bash
cd /var/www/wallabag/
make install

You will be asked several questions regarding desired configuration:

database_driver (pdo_mysql): pdo_mysql
database_driver_class (null): Press Enter
database_host (127.0.0.1): 127.0.0.1
database_port (null): 3306
database_name (wallabag): wallabag
database_user (root): wallabaguser
database_password (null): wallabagpassword
database_path (null): Press Enter
database_table_prefix (wallabag_): Prefix of your choice or Press Enter for the default.
database_socket (null): Press Enter
database_charset (utf8mb4): Press Enter
domain_name ('https://your-wallabag-url-instance.com'): http://IP_or_DOMAIN_NAME 

Choose the default (press Enter) for the remaining questions.

You should now be able to access Wallabag on http://IP_or_DOMAIN_NAME. For better security/privacy, you should consider using a domain name with HTTPS, however this is beyond the scope of this guide.

Posted in LinuxTagged debian, linuxLeave a comment

How to Install PrivateBin on Debian 9.

Posted on February 20, 2019 - February 21, 2019 by nxnjz

PrivateBin is a minimalist online pastebin where the server has zero knowledge of pasted data. This application supports password-protection, expiration, and self-destruction after reading. It is completely open-source and hosted on github. This article will guide through the installation and configuration of PrivateBin on a Debian 9 system.

Prerequisites

  • A Debian 9 server.
  • Root access to your server (via the root user or a user with sudo privileges.)
  • A web server with PHP (Instructions below.)
  • A MySQL database (Instructions below.)

Preparations

If you’re not logged in as the root user, execute sudo -i to obtain a temporary root shell.

Update your system and install required software.

apt update
apt upgrade -y
apt install -y git 

Git will be used to download PrivateBin from its github repository.

Installing a web server stack:

We will be using Apache and PHP. Execute the following to install the required packages:

apt update
apt install -y apache2 php php-xml php-mbstring php-mysql php-json php-pdo 

Make sure Apache is enabled and running:

systemctl enable --now apache2.service 

Configuring Apache

Using a text editor of your choice, create a new configuration file for Apache. For instance:

vim /etc/apache2/sites-available/privatebin.conf

Populate it with the following (insert your IP address or a domain name pointing to your IP for ServerName):

<VirtualHost *:80>
ServerName YOUR_SERVER_IP
DocumentRoot /var/www/html/PrivateBin/
ErrorLog ${APACHE_LOG_DIR}/privatebin-error.log
CustomLog ${APACHE_LOG_DIR}/privatebin-access.log combined
<Directory /var/www/html/PrivateBin>
AllowOverride All
</Directory>
</VirtualHost>

Save, exit, and enable this virtual host:

a2ensite privatebin.conf

Reload the configuration:

systemctl reload apache2.service

Installing PrivateBin

Since PrivateBin is hosted on github, we’ll clone the repository locally:

cd /var/www/html/ && git clone https://github.com/PrivateBin/PrivateBin.git

And give the Apache user ownership of the PrivateBin directory:

chown -R www-data:www-data PrivateBin/

You should now be able to access PrivateBin on http://YOUR_SERVER_IP. For better security/privacy, you should consider using a domain name with HTTPS, however this is beyond the scope of this guide.

Optional

PrivateBin supports MySQL storage in place of the default file-based storage model. To implement MySQL storage, follow the steps below.

Installing MariaDB

apt install -y mariadb-server mariadb-client

systemctl enable --now mariadb.service

Secure your MySQL installation with this command:

mysql_secure_installation

Answer the questions as follows:

Enter current password for root (enter for none): Enter
Set root password? [Y/n]: Y
New password: <your-password>
Re-enter new password: <your-password>
Remove anonymous users? [Y/n]: Y
Disallow root login remotely? [Y/n]: Y
Remove test database and access to it? [Y/n]: Y
Reload privilege tables now? [Y/n]: Y

Make sure you use a strong password.

Configuring MariaDB

Create a database and user for PrivateBin:

mysql -u root -p

MariaDB [(none)]> CREATE DATABASE privatebin DEFAULT CHARACTER SET utf8 COLLATE utf8_unicode_ci;
MariaDB [(none)]> CREATE USER 'privatebin'@'localhost' IDENTIFIED BY 'newpassword';
MariaDB [(none)]> GRANT ALL PRIVILEGES ON privatebin.* TO 'privatebin'@'localhost';
MariaDB [(none)]> exit;

Make sure you replace newpassword with a secure password. It should be different from the password you chose for the MariaDB root user.

Changing Storage Mode

First, copy the default configuration file for editing:

cd /var/www/html/PrivateBin/cfg
cp conf.sample.php conf.php

Using a text editor of your choice, open the file conf.php. Find the following segment:

[model]
; name of data model class to load and directory for storage
; the default model "Filesystem" stores everything in the filesystem
class = Filesystem
[model_options]
dir = PATH "data"

;[model]
; example of DB configuration for MySQL
;class = Database
;[model_options]
;dsn = "mysql:host=localhost;dbname=privatebin;charset=UTF8"
;tbl = "privatebin_" ; table prefix
;usr = "privatebin"
;pwd = "Z3r0P4ss"
;opt[12] = true ; PDO::ATTR_PERSISTENT

And replace it with:

; [model]
; name of data model class to load and directory for storage
; the default model "Filesystem" stores everything in the filesystem
; class = Filesystem
; [model_options]
; dir = PATH "data"

[model]
class = Database
[model_options]
dsn = "mysql:host=localhost;dbname=privatebin;charset=UTF8"
tbl = "privatebin_" ; table prefix
usr = "privatebin"
pwd = "newpassword"
opt[12] = true ; PDO::ATTR_PERSISTENT

Again, make sure you replace newpassword with the password chosen during user creation in the MySQL console, then save and exit.

Restart apache:

systemctl restart apache2.service

And done.

Implementing HTTPS is recommended but beyond the scope of this article. You can obtain and install a certificate, for free, using certbot.

Posted in LinuxTagged debian, linux, pastebin, privatebin5 Comments

Deploying an Interactive SSH Honeypot on Debian 9.

Posted on January 12, 2019 - February 6, 2019 by nxnjz

Introduction

A honeypot is a piece of software or a system that is designed to detect and monitor malicious activity, and deflect attackers from your actual production services and systems. This article will explain the deployement of an interactive SSH honeypot using Cowrie, a free and open-source solution. It can log brute force connection attempts and any commands executed by attackers. Additionally, it employs a fake, isolated filesystem for better interaction and deception. A Debian 9 Server will be used for this tutorial. You can find instructions for Ubuntu 18.04 here, and CentOS 7 here.

Root privileges are obviously required.

NOTE You can obtain a temporary root shell by running sudo -i or sudo su root or sudo /bin/bash if you only have access to a non-root user with sudo privileges.

Preparations

Step 1: Update your system:


apt update
apt upgrade -y

Step 2: Create a new user account


adduser --disabled-password cowrie

After running this command you will be prompted for the following information:


Full Name []: 
Room Number []: 
Work Phone []: 
Home Phone []: 
Other []: 

Leave the fields empty (press enter.)

Step 3: Install dependencies and required packages:

This can be done with the command:


apt install -y python-virtualenv libssl-dev libffi-dev build-essential libpython3-dev python3-minimal authbind git

Installation:

Step 4: Login as the ‘cowrie’ user.


su - cowrie

Step 5: Download the cowrie repository.

Make sure your working directory is “/home/cowrie”


cd /home/cowrie

Cowrie’s code is hosted on github, and can be downloaded with the following command:

git clone http://github.com/cowrie/cowrie

This will download and create a directory ‘cowrie’.

Step 6: Create a python virtualenv.

Virtualenv is a python-based way of running software inside an isolated environment, somewhat similarly to containers.


cd /home/cowrie/cowrie
virtualenv --python=python3 cowrie-env

This will install any missing dependencies and create the required python virtual environment in which the honeypot will run.

Enter this environment with:


. cowrie-env/bin/activate

If successful, you should get a new terminal prompt starting with “(cowrie-env)”. Execute the following to upgrade python-pip and then install the requirements for cowrie.


pip install --upgrade pip
pip install --upgrade -r requirements.txt

Once finished, exit the virtualenv with deactivate.

Step 7: Start the honeypot.

Execute this command:


bin/cowrie start 

And exit back to your root shell:


exit

You can make sure that the honey port is running by issuing:


ss -lntp | grep twistd

You should get:

LISTEN     0      50           *:2222 [...]

Step 8: Test the honeypot

You can test this SSH honeypot by connecting to your server via SSH, but on port 2222/tcp. You should be able to authenticate with the username “root” and any password. You’ll get access to a simulated shell environment in a fake filesystem.

Further Configuration

For a proper honeypot, some configuration changes need to be made. First, we will change the default real SSHD port from 22 to something else, then we will have the honeypot listen on port 22, since attackers mostly target the default SSHD port.

Begin by stopping the honeypot:


/home/cowrie/cowrie/bin/cowrie stop

Step 9: Changing ports.

First, we’ll change the default SSHD port. Port 2332 will be used as an example. You can choose any port number, but make sure it is unused by other services.
In your root shell, issue the following command:


echo "Port 2332" >> /etc/ssh/sshd_config

And restart the SSH daemon service:


systemctl restart sshd.service

Then logout:


exit

Reconnect to your server via SSH but on the configured port 2332 instead. We will now configure the Cowrie honeypot to listen for SSH connection attempts on the default port number (22). Authbind will be used to allow Cowrie to bind to port 22 without giving it root privileges.

Create an empty file for port 22 in authbind:


touch /etc/authbind/byport/22

Give the ‘cowrie’ user full ownership of that file:


chown cowrie:cowrie /etc/authbind/byport/22

Set the correct permissions:


chmod 770 /etc/authbind/byport/22

Using a text editor of your choice, open the file /home/cowrie/cowrie/bin/cowrie. Change this line:


AUTHBIND_ENABLED=no

To:


AUTHBIND_ENABLED=yes

This will instruct our honeypot software to bind to network ports using authbind and not directly.

Switch to the ‘cowrie’ user:


su - cowrie

And create a configuration file in /home/cowrie/cowrie/etc/ named cowrie.cfg:


touch /home/cowrie/cowrie/etc/cowrie.cfg

This file will be used for our custom configuration changes. Open it in a text editor of your choice and enter the following line:


[ssh]
listen_port = 22

Once cowrie is started, any SSH connection attempt should now reach our honeypot and not the real SSH daemon.

Make sure you are still logged in as the ‘cowrie’ user and launch the honeypot:


/home/cowrie/cowrie/bin/cowrie start

Step 10: Configuring allowed users.

While legitimate users and their passwords are stored in ‘/etc/passwd’ and ‘/etc/shadow’, fake SSH users are configured in ‘etc/userdb.txt’ in the cowrie environment. You can choose which users are allowed to connect to the fabricated SSH server, and their passwords.

The following format is used to define users and passwords:


[username]:x:[password]

Each user should be on a seperate line (does not have to be a real existing user on your system), and you can define more than one password per user. If you prepend the ‘!’ character to a password, any authentication attempt with that password will be refused. If you insert the wildcard characted ‘*’ instead of a password, any password will be accepted. For instance:


root:x:!toor
root:x:!admin
root:x:*
admin:x:admin

With the above configuration, the ‘root’ user will be allowed to authenticate with any password, except ‘toor’ and ‘admin’. The ‘admin’ user will only be allowed be login with ‘admin’ as password.

The default configuration is:


root:x:!root
root:x:!123456
root:x:!/honeypot/i
root:x:*
tomcat:x:*
oracle:x:*

To change the default, start by creating a file in ‘/home/cowrie/cowrie/etc/’ named ‘userdb.txt’:


touch /home/cowrie/cowrie/etc/userdb.txt

And using a text editor of your choice, populate this file according to your preferences. Restart cowrie for the changes to take effect:


/home/cowrie/cowrie/bin/cowrie stop

Conclusion

This article explained the deployement of an interactive SSH honeyport and its basic configuration. Connection attempts, shell activity and other details are logged to /home/cowrie/cowrie/var/log/cowrie. You may use a logging server to store and display honeypot logs instead, but that is beyond the scope of this article. The collected data from the honeypot can be used to populate IP blacklists, to identify potential attacks, and for cybersecurity research purposes.

Posted in LinuxTagged debian, linux, sshLeave a comment

Recent Posts

  • CVE-2021-42052 full disclosure
  • How to Set Up an Interactive SSH Honeypot on CentOS 8.
  • HackTheBox.eu Jarvis Writeup
  • How to setup a simple proxy server with tinyproxy (Debian 10 Buster)
  • How to Install qdPM 9.1 on Debian 10 LEMP

Tags

802.11 ampache apache aspx bash cd centos cms crm cve debian exploits fedora fulldisclosure hackthebox honeypot http httpd ifconfig iw iwconfig labs lfi linux mariadb memory monit music nginx pastebin php privatebin privesc project management proxy reconnoitre selinux shopt ssh systemd txpower ubuntu wallabag wireless xxe

Categories

  • BASH (1)
  • CTF/Labs (2)
  • CVE / full disclosure (1)
  • Information Gathering (1)
  • Linux (25)
  • Password Cracking (1)
  • Privilege Escalation (2)
  • SQL Injection (1)
  • Web-Shells (1)
  • Wifi (2)
  • XXE (1)

Recent Comments

  • Bernard Martiny on How to Install PrivateBin on Ubuntu 18.04 LTS
  • VuCSA on List of security labs/challenges/CTFs
  • Brian on How to Install PrivateBin on Fedora 29.
  • Tyreeb on Installing Ampache on CentOS 7.
  • Christian Mora on Installing Ampache on CentOS 7.